A tumbler is like a specialized drinkware used for beverages, and if you want to know how to make and customize it, you are at the right place. It is one of the latest and most unique gifts you can make with Cricut. So, let’s dive into this write-up to discover how to make tumblers with Cricut.
Tumblers are versatile containers that are used for drinking beverages. They are portable, making them suitable for traveling. Tumblers can withstand wear and tear, so you can personalize and gift them to your loved ones and make great last-minute solutions as a handmade gift.
If you are ready to learn something new and craft something unique, read this comprehensive guide and learn all about tumblers and customizing them.
Supplies Needed to Personalize Tumblers With Cricut
These are the materials you will need to personalize tumblers with Cricut:
- Blank Tumblers
- Cricut Machine
- Cricut Design Space software
- Cricut Vinyl
- Transfer Tape
- Cricut Weeding Tool
- Scraper Tool
- Lint Roller
- Cotton Pad
Now that you know what supplies you need to make tumblers, you can learn how to make tumblers with Cricut.
How to Make Tumblers with Cricut: 5 Easy Steps
Follow the below instructions to learn the procedure for making tumblers:
Step 1: Designing the word/ name
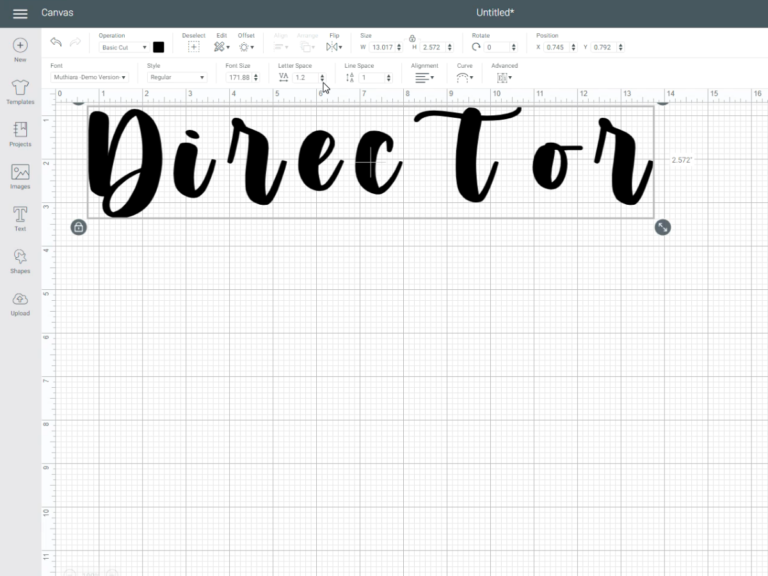
First, open the Cricut Design Space app and Click “New Project.” Then, from the left side of the menu bar, click on Text and type the word or name you want to put on your tumbler. Resize and choose the fonts according to your preference. Now click on the word you wrote and ungroup it to move each letter separately. You need to select the entire word and then right-click to Weld. This is important so the Cricut machine will cut the whole word out in one solid piece.
Step 2: Cutting the Word
Now, you have to place vinyl on the Cricut mat and then load it. Turn on the Cricut machine, load the mat into the machine, and set the dial on the device to “Custom” Set your base materials on your computer to Vinyl, and press the “Go” button on your Cricut cutting machine.
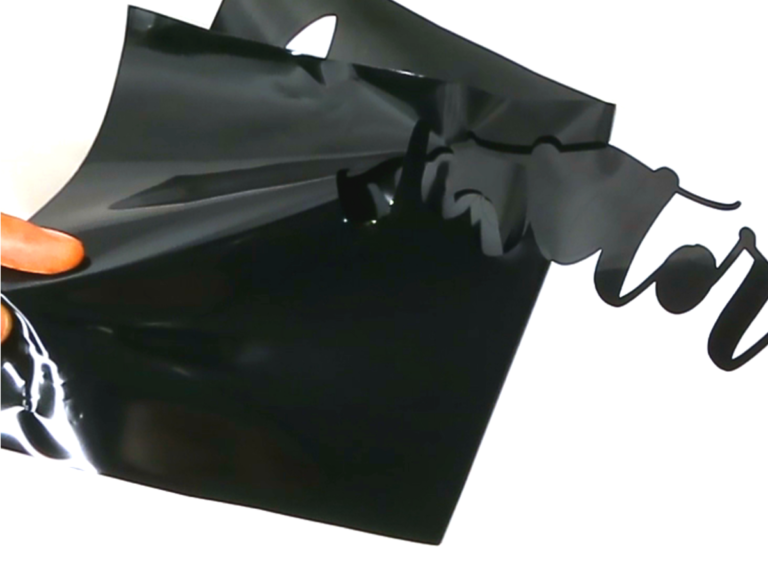
Step 3: Weeding Vinyl
Unload your mat, and then, to remove the excess vinyl from your designed word/ text, use the wedding tool.
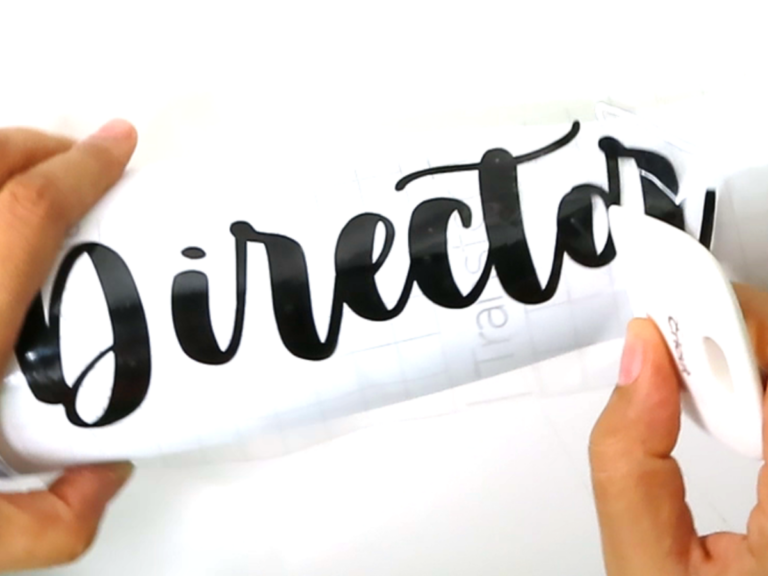
Step 4: Put the Transfer Tape
Cut a piece of transfer tape large enough to cover the word or text you have cut. Then, carefully place the transfer tape on the vinyl and peel the backing off. Then, with the help of the Scraper tool, smooth over the vinyl before removing the backing and making sure the vinyl is perfectly stuck to the transfer tape.
Step 5: Applying Vinyl to the Tumbler

We are in the last step of ‘how to make tumblers with Cricut‘. Use a lint roller to clean your tumbler and to remove any dust and debris, or you can use a cotton pad and rubbing alcohol to clean the area where you will put your vinyl. After your tumbler is dry, place the vinyl exactly where you want to place them. You can use a flee tool to put up your design on the tumbler, ensure no bubble is formed, and then slowly peel off the transfer tape from the vinyl.
How to Take Care of Mugs Made With Cricut
Here are a few tips to follow so that you can take care of Cricut Tumblers:
- Hand wash them, do not put them in a dishwasher, and avoid using scrubbing pads and hard chemical dishwasher liquids to protect the mugs.
- Seal the vinyl with Mod Podge to prevent it from peeling. But if you use Cricut Permanent Vinyl, you do not need to worry much because it is dishwasher-friendly and does not come off easily.
Final words
After reading this user guide, you know how to make tumblers with Cricut. Now, start crafting with Cricut and customize your tumbler into a beautiful work of art. With Cricut vinyl and Permanent vinyl, personalize your tumbler in your way. Without any delay, start making your tumbler for yourself and gifting purposes.
Frequently Asked Questions (FAQs)
How to seal a Cricut tumbler?
To seal vinyl on a tumbler, you must apply a Mod Podge coat. It is like glue sealer and varnish in one. You need to put this over your vinyl design using a brush. When you are done applying it, wait for it to dry, and you can put a double layer of coating on it to ensure it is well used.
What is the after care for tumbler?
Here are some tips for aftercare for Tumblers:
- Do not soak your tumbler in water; avoid using hard dishwasher liquid to clean it.
- Instead of using the dishwasher to wash your tumblers, handwash them. Using the dishwasher can damage the seal, and the viny can peel off.
- When you are washing them by hand, avoid using scrubbing pads or steel wool to clean them, as they can damage the vinyl, and chances are that the vinyl will come off.
What supplies do you need to make tumblers with Cricut?
Before you start making Cricut tumblers, you need to have these supplies read below to know what you will need:
- Blank Tumbler
- Cricut Machine
- Cricut Vinyl
- Scarper Tool
- Cricut Design Space app
- Weeding Tool
- Rubbing alcohol and cotton pads
- Transfer Tape
- Lint roller